 Call
Call


Knolling photography captures objects arranged at precise 90-degree angles, creating visually striking compositions. This unique style transforms everyday items into organized, geometric artworks when viewed from above. You’ll find knolling images particularly appealing if you appreciate clean lines and orderly aesthetics.
The concept originated with a janitor named Andrew Kromelow in the 1980s, but has since gained popularity in modern photography and design. Knolling allows you to showcase multiple related objects in a single frame, making it ideal for product displays, inventory catalogs, or artistic expressions of personal interests.
By experimenting with knolling, you can develop a new perspective on familiar objects. This technique challenges you to find harmony in arrangement and tells visual stories through carefully curated collections. Whether you’re a professional photographer or social media enthusiast, knolling offers a fresh way to present ideas and captivate viewers with its distinctive visual language.
The Origins of Knolling Photography
Knolling photography emerged from an unexpected place – a furniture design studio. Its origins trace back to the 1980s and involve a janitor’s innovative organizing technique.
The Term ‘Knolling’
The term “knolling” was coined by Andrew Kromelow, a janitor at Frank Gehry’s furniture design studio. Kromelow noticed that the angular furniture produced by Knoll resembled right angles when arranged neatly. He began organizing tools at right angles on flat surfaces, calling this process “knolling.”
The practice caught on, becoming a standard organizing method in the studio. It evolved into a photography style when artists started capturing these orderly arrangements from above.
Influential Figures
Tom Sachs, an American contemporary artist, played a crucial role in popularizing knolling. While working at Gehry’s studio, Sachs embraced the technique and incorporated it into his artistic practice.
Sachs famously coined the phrase “Always Be Knolling” (ABK), which became a mantra for organization enthusiasts and photographers alike. His work brought knolling into the mainstream art world, inspiring photographers to explore this visually striking technique.
Other artists and designers soon adopted knolling, contributing to its growth as a distinct photographic style. You’ll often see knolling used in product photography, social media content, and artistic compositions.
Fundamentals of Knolling
Knolling photography centers on precise object arrangement to create visually striking compositions. This technique relies on careful placement and geometric alignment to produce clean, organized images.
Defining Knolling
Knolling is the practice of arranging objects at 90-degree angles to each other, typically photographed from above. You’ll find items neatly organized in a grid-like pattern, creating a sense of order and symmetry.
The term originated in the 1980s, named after Florence Knoll, known for her angular furniture designs. Today, knolling has evolved into a popular photography style used in various fields.
When knolling, you’ll group related items together, aligning them parallel or perpendicular to each other. This creates a visually pleasing arrangement that highlights the relationships between objects.
The Importance of Order and Angles
In knolling, order and angles are crucial elements. You’ll arrange items at right angles, forming a balanced and symmetrical composition.
This precise alignment serves multiple purposes:
- Enhances visual appeal
- Improves object visibility
- Creates a sense of organization
- Highlights relationships between items
By maintaining consistent 90-degree angles and parallel lines, you’ll achieve a clean, structured look. This orderly arrangement allows viewers to easily identify and appreciate each object within the composition.
Knolling’s emphasis on order and angles transforms everyday items into visually striking compositions. You’ll find this technique particularly effective for product photography, inventory displays, and artistic arrangements.
Aesthetic Principles
Knolling photography relies on specific visual elements to create striking, organized compositions. These principles work together to produce aesthetically pleasing images that draw the viewer’s eye and convey information effectively.
Color and Contrast
Color plays a crucial role in knolling photography. Choose a background color that complements or contrasts with your objects. Neutral backgrounds like white or light gray often work well, allowing the items to stand out. For a bolder look, try using bright colors that pop against the objects.
Contrast is key to creating visual interest. Pair light objects with dark backgrounds or vice versa. You can also create contrast through color combinations, such as complementary colors on the color wheel. This helps each item stand out and adds depth to your composition.
Consider using color themes to tie your knolling arrangement together. Monochromatic schemes using different shades of one color can create a cohesive look. Alternatively, a carefully chosen color palette can add vibrancy and interest to your image.
Texture and Depth
Texture adds visual interest and depth to knolling photography. Incorporate objects with different surface qualities – smooth, rough, shiny, or matte. This variety creates tactile appeal and makes your image more engaging.
To create depth, experiment with layering objects. Place smaller items on top of larger ones or use props to elevate certain objects slightly. This technique adds dimension to your flat lay and can help guide the viewer’s eye through the composition.
Lighting plays a crucial role in highlighting textures. Use soft, diffused light to bring out subtle details without harsh shadows. Side lighting can emphasize texture by creating gentle shadows that reveal surface qualities.
Composition Techniques
Composition is the foundation of knolling photography. Start by arranging objects at 90-degree angles to create a clean, organized look. This grid-like structure is the hallmark of knolling.
Balance is essential in your composition. Distribute objects evenly across the frame, considering their visual weight. Large or bold items should be balanced by smaller or more subdued ones. This creates a harmonious overall image.
Use negative space strategically. Leave some empty areas in your composition to prevent overcrowding and give the eye places to rest. This can also help emphasize certain objects or create a sense of simplicity.
Consider the flow of your composition. Arrange items to guide the viewer’s eye through the image. You can create visual paths using object placement, color, or size variations. This helps tell a story or convey information effectively through your knolling photograph.
Knolling in Photography
Knolling photography involves arranging objects at 90-degree angles and photographing them from above. This technique creates visually striking images that showcase items in an organized, geometric layout.
Camera and Lighting
For knolling photography, use a camera with manual settings to control exposure and focus. A wide-angle lens works well for capturing larger arrangements. Position your camera directly above the objects, ensuring it’s perfectly level.
Lighting is crucial. Use diffused natural light or soft artificial lighting to minimize harsh shadows. Place light sources at 45-degree angles to the subject for even illumination. Consider using a lightbox or reflectors to fill in any dark areas.
Experiment with different apertures to achieve your desired depth of field. A smaller aperture (higher f-number) ensures all objects are in focus, while a larger aperture can create artistic blur on certain elements.
Choosing the Right Surface
Select a clean, flat surface as your backdrop. White or light-colored surfaces work best, providing a neutral background that doesn’t distract from your subjects. Consider using seamless paper, a white foam board, or a plain tablecloth.
Texture can add interest, but keep it subtle. A lightly textured fabric or wood grain can complement your objects without overpowering them. Ensure the surface is large enough to accommodate your arrangement with ample space around the edges.
Clean your surface thoroughly before shooting to avoid unwanted dust or debris in your final image.
Arranging the Objects
Choose objects that relate to a common theme or share visual characteristics. Group items by color, shape, or function to create a cohesive composition. Start with larger objects as anchor points, then fill in with smaller items.
Maintain consistent spacing between objects. Use a ruler or grid to ensure precise 90-degree angles. Pay attention to negative space; it’s as important as the objects themselves in creating a balanced image.
Experiment with different arrangements before settling on your final composition. Take test shots to check alignment and adjust as needed. Remember, the goal is to create a visually pleasing, organized layout that draws the viewer’s eye across the entire image.
Applications in Various Fields
Knolling photography has found its way into numerous industries, leveraging its clean aesthetic and organizational appeal. This visually striking technique has proven particularly effective in commercial, social media, and fashion contexts.
Commercial and Advertising
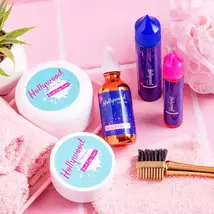
Knolling photography excels in product showcases and advertising campaigns. You’ll often see brands using this technique to display their product lines in a visually appealing manner. It allows companies to present multiple items in a single, organized image, making it ideal for catalogs and e-commerce websites.
Jim Golden, a renowned commercial photographer, has popularized knolling in advertising. His work demonstrates how this style can transform ordinary objects into eye-catching compositions.
Many businesses use knolling to highlight product features or components. This approach works well for tech gadgets, cosmetics, and even food items. By arranging products at right angles, advertisers create a sense of order and professionalism that resonates with consumers.
Social Media Influence
Instagram and other visual platforms have embraced knolling as a powerful content creation tool. You’ll find countless influencers and brands using this technique to showcase their daily essentials, travel must-haves, or product collections.
Knolling’s neat, geometric layouts are particularly Instagram-friendly. They stand out in crowded feeds and tend to receive high engagement. Many users create knolling images of their workspace setups, hobby equipment, or fashion accessories.
This trend has given rise to popular hashtags like #thingsorganizedneatly. Creative Market and similar platforms offer knolling-inspired templates, making it easier for users to create professional-looking compositions for their social media posts.
Fashion and Beauty Industry
The fashion and beauty sectors have adopted knolling to showcase product lines and create visually striking editorials. You’ll see this technique used in magazine spreads, lookbooks, and online stores.
Knolling allows fashion brands to display entire collections or outfit components in a single, organized image. It’s particularly useful for showcasing accessories like jewelry, watches, and sunglasses.
In the beauty industry, knolling helps present makeup palettes, skincare routines, or entire product ranges. This approach enables customers to see all available options at once, aiding in decision-making.
Many beauty influencers use knolling to create “flatlay” images of their favorite products. This trend has become so popular that some brands now design their packaging specifically to look appealing in knolling-style photographs.
Practical Tips for Knolling
Mastering knolling photography requires attention to detail and a keen eye for composition. The following tips will help you create visually striking and organized flat lay images.
Selecting Objects and Props
Choose items that share a common theme or color palette. This creates visual cohesion in your knolling composition. Consider using everyday objects like office supplies, kitchen utensils, or hobby-related items. Vary the sizes and shapes of your props to add visual interest.
Include a mix of textures to create depth in your flat lay. Smooth surfaces can contrast nicely with rough or textured objects. Experiment with different combinations to find what works best for your project.
When selecting clothes or fabric items, opt for pieces that can lie flat without wrinkling. Avoid overly bulky items that may cast unwanted shadows.
Maintaining an Organized Space
Start with a clean, clutter-free surface. Use a plain background like a white poster board or a neutral-colored fabric to make your objects stand out. Keep your work area tidy to avoid accidentally including unwanted items in your shot.
Use a ruler or grid to align your objects at precise 90-degree angles. This attention to geometric precision is key to achieving the classic knolling look. Small adjustments can make a big difference in the final image.
Keep a set of basic tools handy, such as tweezers for precise placement and a lint roller to remove dust or debris from your props and background.
Creating a Captivating Flat Lay
Position your camera directly above the arrangement for a true overhead shot. Use a tripod or a DIY overhead rig to keep your camera steady and maintain consistent framing. This setup allows you to make small adjustments without constantly repositioning your camera.
Pay attention to lighting. Natural light often works best for flat lay photography. Position your setup near a window for soft, even illumination. Avoid harsh shadows by using a diffuser if needed.
Experiment with negative space to create balance in your composition. Don’t feel compelled to fill every inch of the frame. Sometimes, strategic empty areas can enhance the overall impact of your knolling image.
Consider the story you want to tell with your arrangement. Group related items together or create a visual narrative that reflects your personal style or the theme of your project.
The Cultural Impact of Knolling
Knolling has left an indelible mark on visual culture, influencing art, design, and social media. Its aesthetic appeal has sparked creative applications across various fields and geographical boundaries.
Knolling in Art and Design
You’ll find knolling’s influence in modern art galleries and design studios worldwide. Artists like Todd McLellan have embraced this technique, creating striking compositions with disassembled objects. Furniture designers, inspired by Florence Knoll’s neat arrangements, incorporate knolling principles into their showrooms.
Sculptors use knolling to present collections of various sizes and shapes, creating visually compelling installations. In graphic design, you’ll notice knolling’s impact on layout choices, with elements often aligned at right angles for a clean, organized look.
Global Reach and Adaptations
Knolling’s popularity has spread far beyond its origins in a New York furniture fabrication shop. You’ll encounter knolling-inspired photography in Paris fashion shoots and Tokyo product catalogs. Social media platforms have amplified its reach, with users sharing their own knolling creations.
In different cultures, knolling adapts to local aesthetics. You might see traditional wooden artifacts arranged in knolling style in Kyoto, or colorful spices laid out geometrically in Marrakech markets. This global adoption demonstrates knolling’s versatility and universal appeal across diverse cultural contexts.
Interested in scaling your business?
Get in touch with us here. We look forward to working with you.